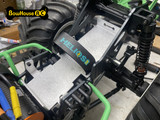
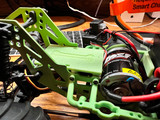
Low CG Battery Tray and Rear Chassis Brace for HPI Venture Low CG Battery Tray and Rear Chassis Brace for HPI Venture Shown with optional battery strap and Helios RC 5200 2S 50C battery pack (not included) Shown with optional battery strap and Helios RC 5200 2S 50C battery pack (not included)
SKU: BHP-0010C
BowHouse RC

Low CG Battery Tray and Rear Chassis Brace for HPI Venture

$24.99

The BowHouse RC Low CG Battery Tray moves the battery forward and lowers it significantly compared to the stock battery tray, helping improve performance and making room for a full interior. We include a rear chassis brace with the tray to replace the brace built into the stock battery tray. This version is printed in high strength nylon. You will need to supply 2 M3x20mm screws and a velcro battery strap (or buy one of ours). Helios RC 2S 5200 mAh 50C lipo not included, but you knew that already. :-)

Need a battery strap? Check out our 200mm Non-Slip Battery Straps in our Accessories and SWAG section:
https://www.bowhouserc.com/Accessories-and-SWAG-c2...

For an even higher resolution version of our battery try, you can purchase the SLS nylon version through our Shapeways store:
https://www.shapeways.com/product/AXB6X3FB7/low-cg-battery-tray-and-rear-cross-brace-for-hpi-v?optionId=64870509


Installation tips:

  • Before installation, use a 3/32" drill bit to clear out excess material from the mounting holes under the front edge of the Low CG Battery Tray and all 4 corners of the Rear Chassis Brace.
  • Remove the stock battery tray by removing the screws that anchor the rear shock towers. You will reuse these screws to install the included rear chassis brace.
  • Remove the stock rear upper link mount screws on both sides. Insert M3x20mm screws (not included) just enough to hold links in place without the end of the screw extending past the end of the plastic holes on the inside of the skid.
  • Loosen the rear-most screws holding the chassis rails to the skid on both sides.
  • Remove the rear bumper mount screw on one side of the chassis. Detach the body clip post from the shock tower on the same side.
  • Pull the chassis rails apart to remove the stock battery tray, slide the Low CG Battery tray into place and insert the rear cross brace. The tabs under the rear of the tray fit inside the c-channel rail, and the mounting screw holes under the front of the tray should line up with the rear upper link mount screws in the skid.
  • Tighten the M3x30mm upper link mount screws until they secure the battery tray.
  • Install velcro battery strap (not included).
Full Description
Battery straps
Qty
  • Description

    The BowHouse RC Low CG Battery Tray moves the battery forward and lowers it significantly compared to the stock battery tray, helping improve performance and making room for a full interior. We include a rear chassis brace with the tray to replace the brace built into the stock battery tray. This version is printed in high strength nylon. You will need to supply 2 M3x20mm screws and a velcro battery strap (or buy one of ours). Helios RC 2S 5200 mAh 50C lipo not included, but you knew that already. :-)

    Need a battery strap? Check out our 200mm Non-Slip Battery Straps in our Accessories and SWAG section:
    https://www.bowhouserc.com/Accessories-and-SWAG-c2...

    For an even higher resolution version of our battery try, you can purchase the SLS nylon version through our Shapeways store:
    https://www.shapeways.com/product/AXB6X3FB7/low-cg-battery-tray-and-rear-cross-brace-for-hpi-v?optionId=64870509


    Installation tips:

    • Before installation, use a 3/32" drill bit to clear out excess material from the mounting holes under the front edge of the Low CG Battery Tray and all 4 corners of the Rear Chassis Brace.
    • Remove the stock battery tray by removing the screws that anchor the rear shock towers. You will reuse these screws to install the included rear chassis brace.
    • Remove the stock rear upper link mount screws on both sides. Insert M3x20mm screws (not included) just enough to hold links in place without the end of the screw extending past the end of the plastic holes on the inside of the skid.
    • Loosen the rear-most screws holding the chassis rails to the skid on both sides.
    • Remove the rear bumper mount screw on one side of the chassis. Detach the body clip post from the shock tower on the same side.
    • Pull the chassis rails apart to remove the stock battery tray, slide the Low CG Battery tray into place and insert the rear cross brace. The tabs under the rear of the tray fit inside the c-channel rail, and the mounting screw holes under the front of the tray should line up with the rear upper link mount screws in the skid.
    • Tighten the M3x30mm upper link mount screws until they secure the battery tray.
    • Install velcro battery strap (not included).
  • Reviews

    Reviews

    Dwayne Fletcher

    Battery tray

    This upgrade battery tray for the HPI is well designed and fits perfectly into the rig. As in the description, Drill out the loose stuff before installing. This is a must for a HPI venture owner!

    Battery

    Seems to be well thought out. Install was easy and works as it should.
  • Details

    Details

    Current Stock:
    SKU: BHP-0010C
    Width: 3.0 (in)
    Height: 2.0 (in)
    Depth: 9.0 (in)