Low CG Conversion Kit for Axial SCX24 Low CG Conversion Kit for Axial SCX24 Low CG Conversion Kit for Axial SCX24 Low CG Conversion Kit for Axial SCX24 Low CG Conversion Kit for Axial SCX24 Low CG Conversion Kit for Axial SCX24 Low CG Conversion Kit for Axial SCX24 Low CG Conversion Kit for Axial SCX24 Low CG Conversion Kit for Axial SCX24
SKU: B24-0010
BowHouse RC

Low CG Conversion Kit for Axial SCX24

$20.00

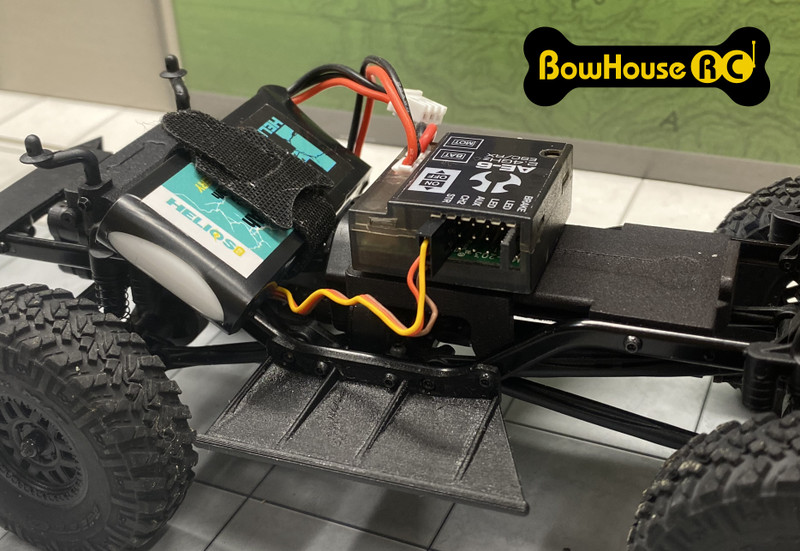
Tiny #tinytrucks are all the rage, and the Axial SCX24 is leading the charge.  You can take your little dynamo to the next level with our BowHouse RC Low CG Conversion Kit for the SCX24.  Here are the highlights:

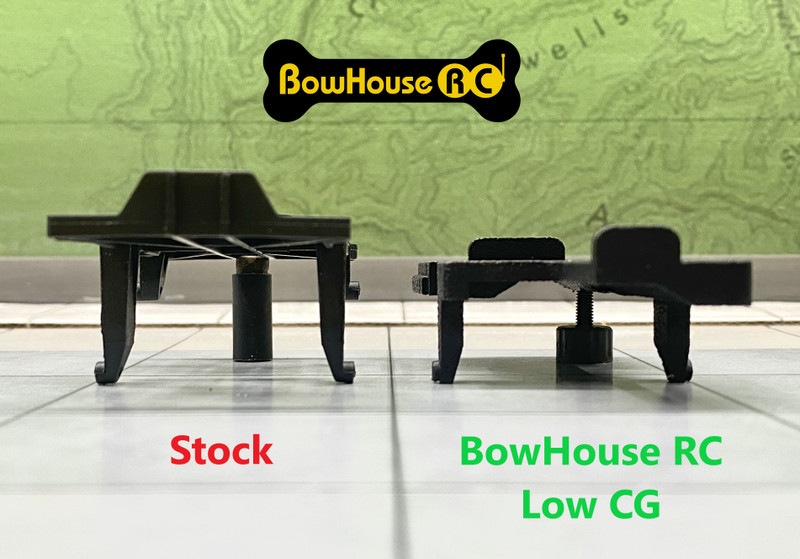
  • Low CG battery tray drops the battery by 4mm down to the top of the rails
  • Low CG ESC tray rotates and lowers the ESC below the rails
  • ESC tray includes integrated shock mounts in 2 positions for compatibility with all SCX24 models
  • Option to install battery on ESC tray and ESC on battery tray for maximum forward weight bias
  • Reuses stock hardware for installation

Please note: The ESC tray will fit on the new Gladiator model but the battery tray does NOT fit the Gladiator.

Includes:

  • 1x low CG battery tray*
  • 1x low CG ESC tray

* Epic Helios RC 2S 600 mAh 45C Lipo sold separately, but you knew that already.

INSTALLATION NOTES

Battery tray:

  • Remove the stock battery tray by removing all 4 screws holding it in place.  Save screws for installation of BowHouse battery tray.
  • Gently spread the chassis rails to remove the stock battery tray from the chassis. 
  • Remove the stock hook-and-loop strap from the stock battery tray and install on BowHouse RC battery tray.
  • Before installing the BowHouse battery tray, start a screw into each screw hole in the BowHouse tray for 3-4 turns.
  • Gently spread the chassis rails to insert the BowHouse battery tray in chassis.  You may need to gently bend the upper motor lead down for better clearance.
  • Insert all 4 screws to secure BowHouse battery tray to chassis.

ESC mount:

  • Remove the stock body mount(s) from the shock towers and save stock screws.
  • Remove the stock ESC from the stock ESC mount carefully.  If removed carefully, you can reuse the double stick tape on the bottom of ESC.  If necessary, remove the original double-stick tape and replace with new tape, hot glue, or other adhesive.
  • Unscrew upper ball studs securing front shocks to shock mounts.
  • Remove 4 screws holding stock ESC tray in place.
  • Before installing the BowHouse ESC mount, start a screw into each screw hole in the BowHouse mount for 3-4 turns.
  • Gently spread chassis rails to remove stock ESC tray and insert BowHouse ESC tray into chassis.
  • Install 4 screws holding ESC mount to chassis.
  • Attach shock ball studs to shock mounts in the appropriate position.  Note that shocks are mounted in front of body mount posts on certain models (e.g., Jeep Wrangler and C10 versions) and behind body posts on other models.
  • Install ESC on ESC mount.  For certain models (e.g., Betty and Jeep Wrangler), ESC should be rotated so that the servo wire plugs are on the drivers (left) side and the motor and battery plugs are located toward the front of the truck.  On other models, the ESC can be installed with the servo wire plugs in front and the motor and battery plugs on the passenger side, similar to the stock configuration.
  • If the ESC is mounted in the rotated position, we recommend running the servo lead through the space between the chassis rail and the BowHouse ESC mount on the drivers side (see pictures).
  • Install body mount(s) into BowHouse RC low CG ESC tray using stock screws.  We recommend using a sewing needle or pin to line up screw holes in ESC tray and body mount(s) before starting the screws.
  • You may need a short servo extension to plug lights into ESC if you are using stock headlights. 

FOR BATTERY FORWARD CONFIGURATION

  • Follow the same steps to remove stock battery tray and ESC mount.
  • Install hook-and-loop battery strap into BowHouse ESC mount instead of on battery tray.
  • If you are using stock headlights, you will need a short servo extension cable to connect the lights to the ESC.  On some models, you will also need a short servo extension cable to connect the servo to the ESC.
  • Battery forward configuration may result in nearly full droop on front shocks depending on your setup.  
Full Description
Qty
  • Description

    Tiny #tinytrucks are all the rage, and the Axial SCX24 is leading the charge.  You can take your little dynamo to the next level with our BowHouse RC Low CG Conversion Kit for the SCX24.  Here are the highlights:

    • Low CG battery tray drops the battery by 4mm down to the top of the rails
    • Low CG ESC tray rotates and lowers the ESC below the rails
    • ESC tray includes integrated shock mounts in 2 positions for compatibility with all SCX24 models
    • Option to install battery on ESC tray and ESC on battery tray for maximum forward weight bias
    • Reuses stock hardware for installation

    Please note: The ESC tray will fit on the new Gladiator model but the battery tray does NOT fit the Gladiator.

    Includes:

    • 1x low CG battery tray*
    • 1x low CG ESC tray

    * Epic Helios RC 2S 600 mAh 45C Lipo sold separately, but you knew that already.

    INSTALLATION NOTES

    Battery tray:

    • Remove the stock battery tray by removing all 4 screws holding it in place.  Save screws for installation of BowHouse battery tray.
    • Gently spread the chassis rails to remove the stock battery tray from the chassis. 
    • Remove the stock hook-and-loop strap from the stock battery tray and install on BowHouse RC battery tray.
    • Before installing the BowHouse battery tray, start a screw into each screw hole in the BowHouse tray for 3-4 turns.
    • Gently spread the chassis rails to insert the BowHouse battery tray in chassis.  You may need to gently bend the upper motor lead down for better clearance.
    • Insert all 4 screws to secure BowHouse battery tray to chassis.

    ESC mount:

    • Remove the stock body mount(s) from the shock towers and save stock screws.
    • Remove the stock ESC from the stock ESC mount carefully.  If removed carefully, you can reuse the double stick tape on the bottom of ESC.  If necessary, remove the original double-stick tape and replace with new tape, hot glue, or other adhesive.
    • Unscrew upper ball studs securing front shocks to shock mounts.
    • Remove 4 screws holding stock ESC tray in place.
    • Before installing the BowHouse ESC mount, start a screw into each screw hole in the BowHouse mount for 3-4 turns.
    • Gently spread chassis rails to remove stock ESC tray and insert BowHouse ESC tray into chassis.
    • Install 4 screws holding ESC mount to chassis.
    • Attach shock ball studs to shock mounts in the appropriate position.  Note that shocks are mounted in front of body mount posts on certain models (e.g., Jeep Wrangler and C10 versions) and behind body posts on other models.
    • Install ESC on ESC mount.  For certain models (e.g., Betty and Jeep Wrangler), ESC should be rotated so that the servo wire plugs are on the drivers (left) side and the motor and battery plugs are located toward the front of the truck.  On other models, the ESC can be installed with the servo wire plugs in front and the motor and battery plugs on the passenger side, similar to the stock configuration.
    • If the ESC is mounted in the rotated position, we recommend running the servo lead through the space between the chassis rail and the BowHouse ESC mount on the drivers side (see pictures).
    • Install body mount(s) into BowHouse RC low CG ESC tray using stock screws.  We recommend using a sewing needle or pin to line up screw holes in ESC tray and body mount(s) before starting the screws.
    • You may need a short servo extension to plug lights into ESC if you are using stock headlights. 

    FOR BATTERY FORWARD CONFIGURATION

    • Follow the same steps to remove stock battery tray and ESC mount.
    • Install hook-and-loop battery strap into BowHouse ESC mount instead of on battery tray.
    • If you are using stock headlights, you will need a short servo extension cable to connect the lights to the ESC.  On some models, you will also need a short servo extension cable to connect the servo to the ESC.
    • Battery forward configuration may result in nearly full droop on front shocks depending on your setup.  
  • Reviews

    Reviews

    Michael Almond

    Lcg tray

    Love the finished product but just FYI on a gladiator the battery tray holes have to be drilled.
    Michael D Hoyle

    Lower CG

    Fit and finish on these pieces were great. No issue whatsoever with installation.
    John Leigh IV

    Low cg conversion kit

    I like not only the look of how it sits, but the quality is strong, one minor adjustment I had to make, was on the right side where I upgraded my motor so I had to saw off the arm connector, but other than that it sits really nicely Hold both my 350mah an my 950mah batteries really well
    Mark

    LcG

    Just Fantastic. These really are low LcG. HIGHLY recommend these for your Scx24
    Jerry

    LCG Trays

    The trays were awesome. Great fit, awesome finish. Will fit a stock motor with no issue. To fit a Furitek Komodo requires a little clearance work, but very little. Very stout construction. The dog bone logo puts it over the top!
    Jerry

    LCG Trays

    Love em. Loved em enough I bought a second set. Fit and finish is great, easy to install. Would buy again...
    Stewart Davidson

    LCG kit for scx24

    Great kit! I am a little behind in technology so I wasn't aware 3D printed parts could be so slick and polished! The dog bone inlay is a cool touch. I would definitely recommend it for a stock truck or a custom build too.
    António Pina Rocha

    Kit rebaixamento bateria

    Muito boa a peça e baixa o centro de gravidade. Envio rápido e bem embalado. Aconselho o vendedor.
    Shawn

    Scx24 lcg

    Exactly what I needed to get next level performance from my scx24.
    David Yancy

    Low Center of Gravity Mount

    Great Product. Fit was great on my SCX24 JLU. Only issue was I had to file down the rear corners of rear tray to get it to clear the stock rear shock mounts. Had to do a 45 on each side to get it to fit correctly. Did the front battery mount and it work great.
  • Details

    Details

    Current Stock:
    SKU: B24-0010
    Width: 3.0 (in)
    Height: 1.0 (in)
    Depth: 4.0 (in)